I mentioned in an earlier post that I am an MVP (Most Valued Professional) for CyberLink, which makes the video editing software I use, PowerDirector. They don’t pay me or anything, but I get early access to new products and that sort of thing.
Recently Fershad Irani of their marketing team sent me some questions by email. I’ve reproduced the questions here, together with my answers. (Note: click here to see the resulting story.)
1. Please give a short background of yourself, (i.e. country, work, etc.)
My wife, Loretta, and I live in rural Colorado in the United States. She’s an artist. I recently retired from IBM, a large computer company, as an IT Architect. My undergraduate degree in Mathematics came from Brigham Young University in 1975, and my masters degree in engineering came from California State University at Northridge in 1984. I’m a ham radio operator, callsign KEØOG, and also have a passion for enjoying our beautiful mountain scenery on motorcycles and ATVs. We live in Ouray County, Colorado, which is filled with beautiful mountains and offers many roads and trails to enjoy these.
2. You’ve owned several motorbikes over the years, where did that passion start?

My 1994 Yamaha Seca II (known outside the United States as the Yamaha Diversion), a 600-cc sport-touring motorcycle. I’m the original owner! That’s the Durango-Silverton Narrow-Gauge Railroad train in the background. The shot was taken in Silverton, Colorado.
3. What made you decide to start taking videos while riding?
I was given a GoPro Hero 2 HD camera for my birthday, which I mounted on top of my helmet. Initially I used it so I could share my rides with my wife. At the time I was doing a lot of dirt-bike riding on the XT-250 in some rugged hills north of Montrose, Colorado. When I showed the raw video to her she enjoyed it! I put up short videos on YouTube using a competing video editing suite which frustrated me, so I made the switch to CyberLink PowerDirector. My purpose was to share my rides with friends, but soon found that other people wanted to see these videos too.
4. Can you describe what type of set up you have when shooting on your bike, and what challenges that poses?

That’s me next to the creek. My GoPro Hero2 HD camera is mounted on top of my helmet. Photo by Gary Garren.
5. Please give us some tips on how to avoid/overcome those challenges.
I carry two batteries for the GoPro to give me more recording time. Also, I now have the “backpack” (a small attachment to the back of the camera) that allows me to control the camera from a remote that I can see while riding. That way I’m sure of what the camera’s doing. In addition, I record on a 32 GB Class 10 SDHC card. Two batteries, which provide power for three to four hours of video, fills up about 16 GB on the card. I offload this to a network hard drive so that it doesn’t clutter up my computer hard drive.
The “Fix/Enhance > Stabilizer” feature of PowerDirector does a good job of stabilizing the very shaky GoPro video.
6. You also make instructional videos for your other passion, ham radio. Can you tell us more about ham, and how you first got involved?
Interest in radio communications dates back to my childhood, but it was not until I was a senior at Brigham Young University that I got my amateur radio (ham) license. To me it seemed (and seems) like magic that a few feet of wire in the air lets me talk with hams all over the world.
In the United States, like most countries, prospective amateur radio operators must pass an examination to get their license. In the US, there’s a question “pool” of several hundred questions. Only 35 of these appear on the examination. Unfortunately, I’ve seen lots of people who are good at taking tests get their licenses, but once they do, they don’t really understand what they can do or how to do it. I’ve taught many in-person licensing courses over the years, and have always tried to convey how to be an active radio amateur, not just how to pass a test. When I moved to western Colorado, a very sparsely-populated area, I could not reach very many people with my classes. So, I conceived the idea that I’d create videos that introduced material that’s written in a standard textbook published by the American Radio Relay League (see this video, which explains how the video introductions work). My concept is that my introductory videos talk about things that aren’t obvious in the book, and then provide a general introduction to the text. I also talk about things that go beyond the material in the book that will later help the new ham radio operator better enjoy the hobby. There are three types of license in the United States: Technician (entry level), General, and Amateur Extra (advanced level). I’ve now completed videos for the Technician and General series. My own license is at the Amateur Extra level.
7. How does your set up for shooting instructional videos differ from your motorcycle set up?
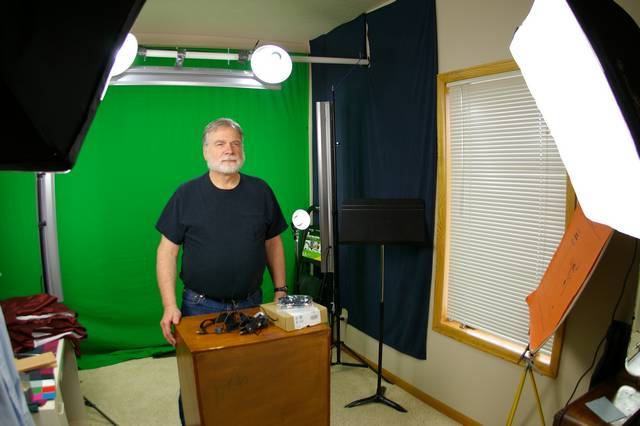
My green screen setup. The green screen is green cloth, and completely covers one wall. The green screen is lit separately. All bulbs are daylight-balanced.
- A green screen studio. The green screen (a piece of cloth) stretches across an entire wall of one of the bedrooms in our home. The green screen is lit separately. I stand in the middle of the room with the green screen behind me.
- Video lighting. This consists of two square softboxes with strong daylight “photo quality” compact fluorescents. One of the softboxes is close and acts as the key light, and all four bulbs are turned on. The other softbox is a bit further away and not all the bulbs are turned on—this is the fill light. In addition, I have two back-lights (hair lights) behind me, up out of view, to provide some clear definition to my head and shoulders to make the chroma key process easier.
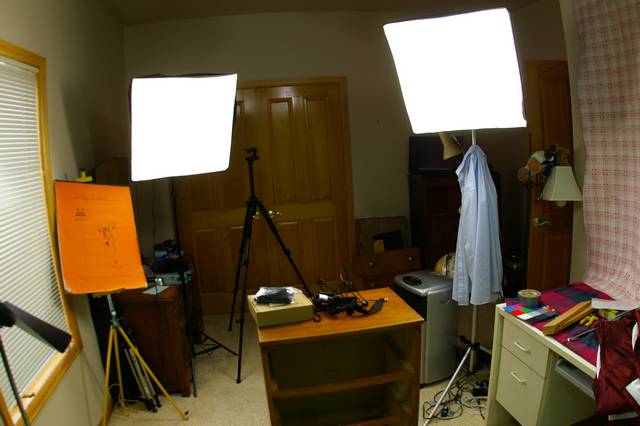
Looking at the softbox lights. I stand right behind that little table in the middle of the room. The video camera is mounted on the tripod shown at the back of the room.
- A tripod-mounted Panasonic HDC-TM90 HD video camera that records AVCHD video to a 32 GB, Class 10 SDHC card using the HA (best) settings. This results in 1080i video at an effective 30 frames per second. I use manual settings for white balance (daylight) and exposure so that I can control the lighting. The camera creates MTS files, which I can download directly into my laptop from the SDHC card and from there into PowerDirector 12.
- Separate audio. I use an Audio-Technica ATR3350 lavalier microphone with a 20-foot cable, which inputs to a Tascam DR-05 audio recorder. I also use manual settings for this for best results, setting the input gain so that voice peaks are about -12dB. This allows me to capture clear audio with no clipping. The audio is recorded to a mini SDHC video card. I use an adapter to move the audio files from this card directly into my laptop. Synchronization of the audio to the video is helped by using a makeshift clapper board at the start of each clip.
- Teleprompter. I recently moved from speaking extemporaneously to reading from a script that I write. I did this because my extemporaneous speaking often included errors, or I’d leave out something important. Now I use scripts and try to read them with as much animation and gestures as I’d use when speaking extemporaneously. For the teleprompter, I use my laptop, which sits atop a music stand so that the screen sits just below the camera. The teleprompter software is open-source TeleKast. TeleKast is primitive and can be frustrating to work with, but I’ve got it figured out for what I need it do.
- Camera stand for white board. I have a homemade camera holder that points straight down at my desk. On the desk is a small white board on which I can draw sketches to illustrate the points I want to make. I’ve tried many methods for this, and so far this works the best.
8. When editing all your videos, what are the technical challenges you face, and how do the PowerDirector 12 features help you overcome these challenges?
The motorcycle videos are the hardest. No one wants to watch long, boring videos, so I edit them down to the interesting stuff. If I’m doing a video about how to find a particular trail, I’ll show the key turns along with the various road signs. Sometimes I’ll take what could be long and boring (a 45-minute run up Engineer Pass Road) and compress it to five minutes using PowerDirector’s “Power Tools > Video Speed” tool. I particularly like autumn color videos, and usually set these to music using PowerDirector’s Magic Music tool. (Sometimes I find it convenient to directly create the music using SmartSound’s SonicFire Pro 5.8 software—this is the same capability as in PowerDirector’s Magic Music tool, but the SonicFire Pro software can sometimes provide a higher level of control.)
I shoot the ham radio videos specifically to be easy to edit. For each video that shows me with the green screen in the background, I substitute another background behind it, which can be a video or a backdrop. PowerDirector 12’s updated chroma key tool (found under “Modify”) is a great improvement from earlier versions, but I discovered that one of the New Blue effects included in the Ultimate version of PowerDirector is a Chroma-Key effect. This pulls a truly outstanding chroma key. The New Blue tool has issues (the color picker doesn’t work, so I need to do a workaround to tell the tool what the color of the green background is exactly), but I now use the New Blue chroma key tool exclusively for green screen work.
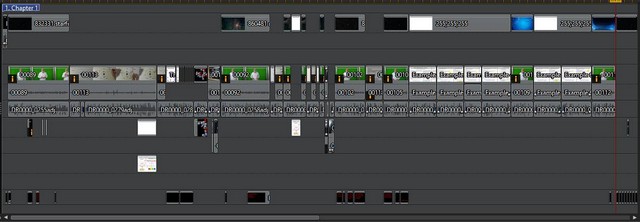
Here’s what my PowerDirector 12 timeline looks like for one of the recent ham radio training videos. It takes about six hours of editing to produce a fifteen-minute training video.
I added a few backgrounds to supplement those that come with the software. Recently I’ve been using NASA star field photos as backgrounds. It’s handy to know that the background directory is C:\Program Files\CyberLink\PowerDirector12\Background\16_9 (for Windows 8.1—it may be different for other operating systems). Photos can be placed here that are 1920 x 1080 pixels. These can be accessed from PowerDirector from the media panel by clicking the dropdown and choosing Backgrounds.
I also have to link the audio and video together for each studio take. This takes only minutes and is best accomplished by stretching out the timeline so I can look at the audio waveform. It’s easy then to line up the audio with the video at the moment of the clapper snap. I’m a real stickler for getting this exactly right, down to the frame.
I have to edit the audio on each clip to first compress it a bit for more robust audio, and also bring the levels up so that it just barely peaks at zero dB. AudioDirector does this, but unfortunately the modifications cannot be saved as a template, which means I have to make all the settings again manually for each clip. Until such time as AudioDirector allows saving of templates, I find it easier to do this compression work in Audacity.
I take several clips for each scene in the ham radio videos, so I pick the one I like the most and add it to the timeline. I create the timeline in chronological order as that seems to work best for me. While editing I create title overlays for some of the scenes. Some of the scenes have several layers, occasionally akin to animation. My new laptop is fast enough that I can review the video across the timeline in near real time, which is handy. Sometimes when a segment is particularly intricate, I’ll edit it separately, render it, and then pull the rendered segment into the timeline as a unit.
I’ve done considerable experimenting on the best settings for YouTube. I select “H.264 AVC,” then select the “AVC 1920×1080/24p (16 Mbps)” setting, then render (which PowerDirector calls “Produce”). On my laptop, the videos usually render in near real time. Uploading the resulting M2TS file to YouTube is, of course, much slower. I like the H.264 settings, because viewing the video on YouTube gives about the same quality as though I were viewing the local copy of the M2TS file. Many of my recent videos are greater than 15 minutes in length, so a direct upload works best. I really like the way PowerDirector 12 renders, a nice improvement over previous versions. Hopefully as people view my training videos, they’ll see the progression in production values from pretty primitive to more sophisticated.
9. Have you got any tips for people who might want to follow your passion for ham radio, or motorcycling?
Share! Whatever your passion, other people would like to learn from you. Think through how you learned it and what pitfalls you had to overcome. Then create videos that helps others. And sometimes the sheer beauty alone justifies a video. Video is more effective than prose by a long shot, and people prefer watching over reading. Over time, you’ll build up a community and will find that thousands of people will subscribe to your YouTube channel. Every time I put up a new video, I get more subscribers.
10. Please add other topics/pointers that readers may be interested to know about you and your passions.
My ham radio training videos are on YouTube. A listing of the videos (which is helpful so they can be viewed in the proper order) is found at www.ke0og.net/training for the Technician videos and www.ke0og.net/general for the General videos. If you subscribe to my blog at www.dcasler.com, you’ll get a notification for each upload, plus all the other posts I make. You can also subscribe directly to my YouTube channel at http://www.youtube.com/user/davecasler.